Friday, June 26, 2015

Wall Decor

Hello Krafters!

Today I am sharing a cute and inexpensive home decor project with you! I am not one to have a lot of family photos on the wall, but a friend on FaceBook shared a photo from a business that really liked over a year ago. In my attempt to spruce up the family room, I remembered her post! I’m glad I did because we did not have any up-to-date photos up and not one of RJ! It was time for change.  

I went on Amazon to compare the price and for the kit, the price ranged from $35 and up. I ended up purchasing a clock kit for $14.00 and purchased a few picture frames from the Dollar Tree. I have to say, overall, the selection was nice for frames. Any who, I decided to change up the design just a little than from the original. On the photo my friend shared, they used 4x6 photos. For the 12, 3, 6, and 9, I used 5x7 photos instead. I wanted those particular photos to be a little larger. The wall saying on theirs was,  “Time with family is worth every second.” I love that saying, but again, I want to make it my own. So I used the Cricut and a Teresa Collins cartridge for the saying. To me, time with family is EVERYTHING! 


I spent a fraction of the price and I was able to make the project my own. 


I hope you enjoyed today’s project. Thanks for stopping by, Krafthead~

Tuesday, June 23, 2015

Handsome Fellow- SASL DT Project

Hello Krafters!

It’s my day over at the She’s A Sassy Lady blog! I believe there is a time in every crafter’s life when he or she gets burned out or lose their creative flow. I was there about a year ago. I would get ideas, but when I would go into my crafting space, things would not go right and I would be frustrated and leave. Although I was afraid, I took a well needed break. The reason why I was afraid was because I did not want to be so far gone that I did not return to something that was once enjoyable for me. 

After not even going in the room for months, I entered the zone. I felt on papers, I organized some items, I purged, and then something happened. I was inspired again! I rediscovered old items and rekindled love for machines I pondered on getting rid of. I was in love with the craft I started to despise! 

One of the first things I did was enter a challenge on one of my frequently visited forums. I had not used my Explore except for once (just to make sure it worked) and there is sat. The Cricut Challenge Forum allowed, actually forced, me to learn Design Space and use the Explore. I must say, I was pleasantly surprised at how well it cut. While the program lacks some features I use in other software, it is easy to use. This month, I joined a “lift” challenge as well. 

Why did I share all of this? Well if you ever get to that place, it is ok to take a break. When you finally feel inspired, join a challenge or two. Challenges make you accountable for creating (at least for me) and you can have encouragement from fellow scrappers! It was exactly what I needed after my slump.

Today, I am sharing a “lift” from a young lady who goes by Liljenny. The challenge is to lift a layout of the person who signed up for the challenge ahead of you. While there was a lot to choose from in her gallery, I chose this one. It is a pretty clean and simple design. This is the first traditional scrapbook page I made in over a year and the first one of my son! Here is my version:


I used navy Bazzill cardstock as the base. The photo was matted on white Bazzill cardstock. The pattern papers came from the DCWV Guy Stack and the Swagger stack by Fancy Pants. I did a few fishtails on the ends of those to add to the design (and to make it my own). I used brads I had in my stash to add a little interest to the page. The sentiment is from the Lovely Floral Cricut cartridge. It is on foam squares for dimension. I also added a little journaling to the page in a white gel pen and that is it! 


I hope you enjoyed today’s project! Remember to stop by SASL to check out the other DT members! Thanks for stopping by, Krafthead~

Sunday, June 21, 2015

Father's Day Card Share

Hello Krafters!

I am stopping by to share a couple of Father’s Day cards I made for some of the men in my life! Most of the cards took me only a few minutes to complete…yep my 10 minutes or less cards! Hopefully this will be a short post! Enjoy! 

The first card I used a stamp set by Hero Arts (LOL). I am not sure if I like this set yet. I can see a lot of potential for it. I mean, everyone has a phone attached to them! The set can make nice cards for teens or the “technology” lover. One thing I like about the set is the blank speech bubbles. I can add my own words/phrases to them. I don't like the solid phone image though. It took me several times to get the stamp “used” and I had to go over it a few times to make it a solid image. I am happy I used the K.A.S.T.I.! I made the background paper using a few stamps from the set. Since this card was for my brother, I wanted to not go overboard. I added a little Wink of Stella to the phone for a subtle shimmer to the phone without making it “glittery” or girly. 

The second card was inspired by a video I saw a while back on YouTube. Unfortunately, I do not remember who it was. I liked how she used the stripes and she has her sentiment attached to the stripes. The background was made by Copic markers and the Tim Holtz Spritzer. This was the first time I used it after having the thing for well over a year! I can see myself using it again! Any who, I made my “splotches” in three different colors and used those same colors to color the stripes. I stamped “Happy Father’s Day” from a Technique Tuesday sentiment stamp set. I added a little Sakura Gelly Roll Pen. It actually gave the same effect as the Wink of Stella Pens! Very subtle shimmer. Card complete!

The final card I put the Cricut Explore to work. With the exception of “designing” and cutting this card took less than 5 minutes to put together. I made the background using basic shapes in the Design Space. I used square, made it into a rectangle, at 4.25x5.5. I then duplicated the rectangle, resized it to fit into the first rectangle and sliced the image. Once I had a frame, I added the strips and then did the same thing for the circle. I welded the two images together to make the background image. The sentiment is from Wild Card (I believe). After the images were cut, I placed them on the card base and that was that!


So I hope you enjoyed these Father’s Day cards! Thanks for stopping by, Krafthead~

Monday, June 15, 2015

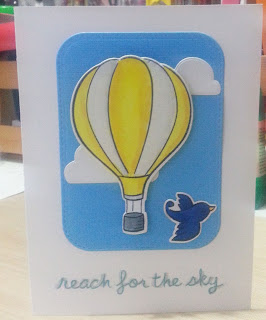
Reach for the Sky

Good morning Krafty people!

I’m here to share another 10 minute or less card. This one actually took me 14 minutes. That was because I kept changing my mind through the process. Anywho, this is a graduation card for a young lady at my church who is also transitioning from elementary school to middle school. While a lot of people don't see the significance in this, I believe this is a major step in a young person’s life and it should be celebrated. Everything they knew is no more. New adventures, experiences, discoveries, and maturity are ahead. That is HUGE!

I used the “reach for the sky” sentiment for a two fold reason. First to keep God in the midst of everything and when you reach for the sky, there is no limit to what can be done. She can do anything she puts her mind to. 

I wanted to keep this card quick and simple. I used two different Lawn Fawn stamp sets for the image. The images were colored in using Copics. Side note: I really need to buy more Copics! Being able to blend out colors is important. Moving on, I used a piece of scrap paper for the image matting. To finish the card, I stamped the sentiment and used Wink of Stella to go around the sentiment, bird and part of the balloon. What I did not realize is that I grabbed the wrong color of Wink of Stella, but it worked out in the end. 

On the inside of the card (not pictured), I stamped the little birdie and wrote my message. 

 I hope you enjoyed today’s project! Thanks for stopping by, Krafthead~

~~~Supplies~~~~

Paper Trey Ink (White)-card base
Bazzill (Blue)-mat
Neenah White Card Stock (White)-images
Copic Markers
Wink of Stella-Silver
TH Distress Ink-Faded Jeans

~~~Dies/Stamps~~~

Lawn Fawn- Blue Skies, Sunny Skies

MFT-Rounded Stitched Rectangle

Tuesday, June 9, 2015

Comparison Between the AG Minc, Laminator and the YourStory

Hello Krafters!

As promised, I have a video comparing the Anna Griffin Minc, a regular laminator and the YourStory foiling. As a word of warning, I have not edited a video in forever so this is a little rough. I promise future videos will be better! I wasn't really surprised by the results...enjoy the video. Thanks for stopping by, Krafthead~

Friday, June 5, 2015

SASL DT Congratulations Wedding Shaker/Easel Card

Hi Krafters~

It is my day over at She’s A Sassy Lady! Make sure you go over there and check out the other design team members! Trust me when I tell you, if you need inspiration, that is the perfect place to go! 

My mom asked me to make a wedding card for her bosses’ daughter. Talk about pressure! I wanted to make a “pretty” card, something the couple can cherish, but also something interactive. Hmmmm what to do? I had a lot of designs in my head but none of the felt right. Plus I did not have a color scheme to go with. I went with white with silver accents. 

Shaker cards are all the rave right now! What else are we going to do with all of those sequins? I also wanted to play with my new Anna Griffin Minc (a review is coming soon). I decided to do a shaker easel card. It is something interactive but can sit nicely on the mantel. 

For this A2 sized card, I used the Cricut and Design Space. While the heart, rings and “congratulations” were cutting on the machine using the ink toner sheet included with the Minc, I embossed the mat with a Cuttlebug folder and cut out a circle frame. I used one of the backgrounds which also came in the Minc bundle. This was the first time I used it. Again, a review is coming! Anywho, all of the elements were cut out and I assembled the card. The Anna Griffin background adds the silver foil element I wanted and it is also the backing for the sequins (iridescent and silver) in the shaker portion of the card. I also foiled the sentiment and the rings. The heart is mounted on recycled packaging I had. I threaded the rings with the shear ribbon and added faux pearls to the heart. 

In the inside, I stamped a wedding poem. To help the easel stay propped up,  I stamped a ring and popped it up with a pop dot. That’s it!

I hope you enjoyed today’s project! Remember to stop by She’s A Sassy Lady for more inspiration! Thanks for stopping by, Krafthead~

Supplies:

Paper Trey Ink- White Cardstock
American Craft (Anna Griffin) Foil-Silver
Shear Ribbon
Viva Decor Pen-White
Paper Studio-Sequins (Silver & Iridescent)
Cuttlebug Embossing Folder-Hearts
Stamps- Cloud 9-Wedding Simple Thoughts Stamp & K I Memories Just Married #2130
Momento Black Ink

Tools/Dies:
Cricut Explore
Cricut Design Space-Martha Stewart Elegant Cake Art, Life’s A Party, & Wedding
Anna Griffin Minc
Spellbinders-Classic Circle Dies

Fiskars Fuse

Wednesday, June 3, 2015

Way To Go

Happy Wednesday Krafters!

I know several people who has recently graduated or will be in the next few days. My oldest daughter will have her completion ceremony next week from elementary school. It is hard to believe she will be going to middle school next school year! Her teacher graduated recently in hopes in becoming a principal. Although she is new to the school this year, we have a really good rapport. So I wanted to share the card I made for her with you!

I wanted to have a little fun with this card. I used Design Space to layout the card’s design. I deviated from my original template just a little bit to add “movement” or the allusion of the caps being thrown in the air. I’m glad I did!

The caps and the buildings in the background was cut with the Cricut. While those were cutting, I used Lawn Fawn’s Large and Small Stitched Rectangles (you might get tired of seeing them but hey they are my new favorite1) for the matting. I also used the Stitched Hills and the Blue Skies (Clouds) dies from Lawn fawn. 

In the middle of the caps for interest and to make the hat look a little more realistic, I used brads I had in my stash. They were different colors,  so I colored them with the black Copic marker. Once the card was assembled, I added Wink of Stella (clear) to the clouds for a subtle shimmer. I also used a stamp from my stash. 


For the inside, I stamped a sentiment and a graduation hat to tie in the inside to the front of the card. That’s it!

I hope you enjoyed today’s project! Thanks for stopping by, Krafthead~

Supplies:

Wink of Stella- Clear
Brads
Paper Trey Ink-White Cardstock
Recollections Cardstock- Black, Blue & Green
Bazzill Cardstock-Glitz Blue
Copic Marker-Black
Stamps-unknown companies
Momento Black Ink

Tools/Dies:
Lawn Fawn-Stitched Rectangles (large& Small), Blue Skies dies, and Stitched Hills
Cricut Explore
Cricut Design Space-Going Places & Locker Talk 

Fiskars Fuse

Monday, June 1, 2015

10 Minute or Less Thank You Elephant Card

Hi Krafters!

If you have been following me for a while, you know I do a lot of 10 minute or less cards! One of the main reasons why I do them is because I can get something accomplished. This is especially true with having an infant in the house. Time is of the essence! I can do what I love to do (craft) and leave the lab (craftroom) with a completed project!

Today I am sharing a quick thank you card. A lady from my husband’s job bought the baby an outfit. I wanted to make a thank you card. Side note, I am in the process of reorganizing stamps and rediscovered stamps. Since the card was for a baby gift, I used a baby image. I was also able to play with Copics. I also discovered I need more Copic Markers :/ 


Anywho, this cute little elephant came from a set by Inkadinkado (Welcome Baby). When I first started out, I was dumb and did not label the sets when I stored them years ago (thank the Lord for internet because I found the name). I used the Large Stitched Circle and Rectangle dies by Lawn Fawn (yep, you know it, my new fave!!). The pattern paper is an older paper from DCWV (Nana’s Nursery-Boy). It went perfectly with the colors I chose for the elephant. The sentiment is from Lawn Fawn (Scripty Sayings) and the banner is a Spellbinder’s die. To add a little something, I inked the edges and added iridescent sequins. That’s it! 


It really did take 10 minutes or less because the image is small thus making it easy to color. The Lawn Fawn dies made the mat easy and everything else fell into place. 

I hope you enjoyed today’s project. Thank you for stopping by, Krafthead~