Friday, March 30, 2012

Poster Board?

Happy Friday Krafters!

I know you all are wandering what does foam core poster board have to do with storage?? Well let me tell you, foam board can provide storage for an array of crafty goodness! It is sturdy and can be altered to fit your needs!

 
 I have shared this storage tip before on my YouTube channel, but I thought it would be good to share it here during storage week. It is a great way to store your markers. All you need is foam board, pencil, hot glue, X-acto knife and long straight edge (T-square or yard stick)! It is simple to put together. Here I cut a top, bottom, back and two sides. I also added shelves for the markers which are slightly slanted to help the markers stay put. I also added middle sections to not only separate the colors of the markers, but to add support to hold the weight of the markers. It is not the prettiest thing to look at, but it does the job it was built to do!


Now I love the Making Memories Embellishment Center. However, I would rather spend my money on paper, supplies and whatnot! Again, using my trusty foam core board, I built a make-shift embellishment center. Again, all it takes is the board, pencil, glue, X-acto knife and straight edge. Add support in the middle so the shelves do not sag from the weight! I have a shelf that cost less than $5 to make! Both shelves has been up for over year and still going strong! My advice is to make sure you measure the space between the shelves to be able to accommodate all of your goodies; I miss measured on one of them *blush*. You can make one unit out of one sheet of foam board, but you may need two sheets depending on the size you desire.


There you have it J I hope you enjoyed today’s tip! Thanks for stopping by, Krafthead~

*DO NOT USE DOLLAR STORE FOAM BOARD, IT IS NOT AS STURDY AS ELMER’S*

Wednesday, March 28, 2012

Out of the Man Den~

Happy Wednesday Krafters!

Moving forward on the theme of storage tips, peg boards are a necessity IMHO! Pegboards are not just for the garage or “man den”! They can provide extra space for tools, ribbon and other crafty goodness. They are great in small and large spaces alike! They can also make awesome focal points in your craft space J


I know today’s post is very short, but peg boards are the way to go. Enjoy your day, Krafthead~

Monday, March 26, 2012

Negative Space~

Hello Krafters!


When I started this blog, I committed to share projects, tips, ideas and thoughts that are craft related. This week is all about storage ideas and tip! So with that in mind, I would like to share with you a storage idea. Many of us try to utilize all of the wall space, but we tend to forget about the space in the other parts of the room. Why not use the negative space in the middle? If you know me, you already know I am all about using every square inch on my space! The idea is not original; I saw it on cricut.com a while back. However, I customized it to fit my needs.

While at the home improvement store, there was a sale on shelving. Initially, buying shelving was not the reason why I went to the store, but I am glad I checked it out! As I walked down the aisle, I saw a build a closet set and thought about my craftroom. Long story short I bought two components. When got home, I built the shelves into a cube instead of as it was intended (as shelves). By me doing it this way, I was able to store the machines I use most on the table instead of having to pull them out when I needed them. For less than $25, I have added more space to my room and the machines are easy to access!


This idea is great if you have multiple die cutting machines, you have limited space or just want to maximize your work area. I hope you enjoyed today’s tip! Thanks for stopping by, Krafthead~

Friday, March 23, 2012

Blessings~

Hello Krafters,

I would like to share my first project using the Cameo! I wanted to see for myself how detailed this baby could do and I have to say, it DID NOT disappoint! I couldn’t let a good cut like this go to waste. This card can be used for many occasions J


I hope you enjoyed today’s project. Thanks for stopping by, Krafthead~

Products:
Silhouette Cameo
Grand Calibur-Fancy Tag
Musical Flourish Embossing Folder
Halfback Pearl
Sentiment Stamp
Gardenia


Wednesday, March 21, 2012

God Bless~

Hello Krafters~

There is a family that attends my church that is moving away. I decided to make them a card. BDM from Riley’s Custom Creations made a beautiful sympathy card with a Christmas stamp. Her card was my inspiration J Thank you!!
I hope you enjoyed today’s project. Thanks for stopping by, Krafthead~
Materials:
Faith Pattern Paper- Paper Studio
Versa Mark
Embossing Powder
Lace
I Am Roses
Pearl String

Monday, March 19, 2012

Ribbon Cutter by Imaginisce~


Happy Monday Krafters~

Today, I would like to share a thought about the Imaginisce Ribbon Cutter. I really like it! It heats up quickly and cuts ribbon like butter. My one complaint is that it does take four batteries to operate. Also, I think a clip or something should have been a part of the design to hold the ribbon in place. This is just my own opinion though. Overall, I think it is a great tool to have especially if you like to use a lot of ribbon. I also did a quick video on this tool.
I hope you enjoyed the review J As always, thanks for stopping by, Krafthead~
* If you like to use a lot of organza ribbon, I do recommend keeping this type of ribbon on the wire no more that 2-3 second. Otherwise, it will MELT on the wire!!!!!
Photo courtesy of Imaginisce J

Friday, March 16, 2012

Just A Note~


Happy Friday Krafters!

First I would like to say thank you ALL of my followers! I appreciate each and every one of you; I really do! It is because of all of you that keep me inspired to share projects J

Today, I would like to share a card for a dear friend. We don’t have an opportunity to speak often, but when we do, it is great! I just want her to know I was thinking of her. The photo is not the best as I took it with my cell phone, but I hope you get the gist of it…

I hope you enjoyed today’s project. As always, thank you for stopping by, Krafthead~
Products Used:
CCR- Sentimental Cartridge
Cricut Mini
Cuttlebug-Script Embossing Folder
Grand Calibur-Picot Die, Tag 2
Antique Bronze Crackle Paint
Walnut Stain
Bo Bunny et Cetera
Martha Stewart Butterfly Punch
I Am Roses
Recollections Pearls
Charm
Pleated Trim
Pearl String
Postage Stamp
Caramel-Stampin’ Up
Crystals
Stickpin

Wednesday, March 14, 2012

Dapper Sketch


It’s Hump Day Wednesday!

On Monday I shared a layout of Grandpa. I decided to share the sketch I made up for that layout. I can’t wait to see the different interpretations! I hope you enjoy the sketch, Krafthead!

Monday, March 12, 2012

Dapper


Happy Monday Krafters!

I trust you all had a good krafty weekend. Not much krafting going on for me. However, I do have a layout I would like to share. The “Dapper” man in the photo is DH’s grandfather. He was a Master Barber by trade. He owned his own barber shop in Illinois. His grooming skills have trickled down to DH. He is a natural barber! I was afraid to do this layout because I know how much DH value this photo. I hope I did right by him J


I hope you enjoyed the story and layout I shared of Grandpa. As always, thanks for stopping by, Krafthead~

Products Used-

DCWV-Regal, Tattered Time, Guy

Charms

Grand Calibur

Picot Die

Gathered Twigs Distress Ink

Distress It All

Postcard Stamp

Collage Stamp

White Ink

Photo Corners

Antique Brass Crackle Paint

Friday, March 9, 2012

Reminder!

Happy Friday Krafters!

I don't have a project, tip or sketch to share today. However, I did want to remind those of us who live in the States that Sunday is Daylight Savings Day! That means we SPRING AHEAD this weekend. Yes we lose an hour of sleep LOL. BUT we will have daylight longer YAY! Have a great weekend and don't forget to set those clocks :)

Thanks for stopping by, Krafthead~

Wednesday, March 7, 2012

I Am Sharing~


Happy Hump Day Krafters!

Usually when I work on a card, I wing it. I have one thought or focal point that the card is built on. I have no idea what to do or how it is going to turn out until I feel that I am done. I realize this is not the smartest way to get a project done LOL. However, it is my process J

As weird as this is, I do make a template/sketch for layouts! When I have a thought, I open up a program on my computer and transfer my idea into a template and go with it. Sketches are really hot right now, so today, I am sharing one of my templates/sketches with you. I am not a professional, but I hope you like it anyway J

Thank you all for stopping by, Krafthead~

Monday, March 5, 2012

Yay For Purple!

Happy Monday Krafters!

I hope you all had a great krafty weekend! My weekend was pretty nice. I was able to get a few things done around the house. Anywho, today I am sharing a quick and easy project. It only took a few minutes to put together.

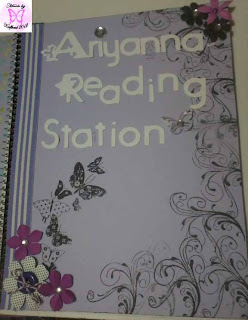
My oldest daughter’s favorite color is purple. She was pretty sad when she had to purchase a new notebook for her reading station that was red. So to lift her sadness, we put the Imagine to work! We really could have altered it up, but I wanted to leave simple since she is only in the second grade J

Front Cover:

I printed a solid purple sheet from Imagine More Cards at 8.5x11” (it had to be trimmed to size). *Yes I could have used a regular piece of cardstock, but I printed the pattern first and wanted the covers to match*I stamped a simple flourish (repeated) and a butterfly collage using Momento Black Ink. The letters were cut from the Hannah Montana Cartridge (one of my favorites!)  at 1”. To hide the red on the notebook, I colored the spine black with a Copic Marker and added a striped purple and white ribbon. I used Mother’s Day Bouquet for the flowers and flood filled them with colors and patterns from the Teresa Collins Black and White Imagine Cartridge. To finish it off, I added a few rhinestones and a butterfly from a Martha Stewart Punch.  

Back Cover:

This time I printed a pattern using the Imagine More Cards trimmed to size. I stamped one flourish to tie the front design to the back.  To keep her encouraged, I stamped “I’ll always be simply the best” on the back.

That’s it! She now has a simple but cute notebook to take to school that she adores J I hope you enjoyed today’s project. As always, thanks for stopping by, Krafthead~

Friday, March 2, 2012

Thank You~


Happy Friday Krafters!

Can you believe it is March already??? Time is going by so quickly! Spring will be here before we know it!
I have a good friend who has been involved in some of the most important events in my life. We do not talk often, but we check in from time to time. I never realized how she has impacted me. She is a true jewel! Recently, she sent me a card out of the blue and it meant so much to me. I will cherish our friendship.
This card very busy; yet it is a true reflection of her and her personality. I used Graphic 45’s Le Romantique for all of the pattern papers. I tell you, those papers are gorgeous!
I appreciate your visit! I hope you enjoyed today’s project, Krafthead~

Please remember to stop by my other blog for more projects :)