Showing posts with label stamping. Show all posts

Monday, June 15, 2015

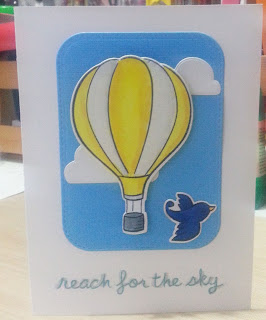
Reach for the Sky

Good morning Krafty people!

I’m here to share another 10 minute or less card. This one actually took me 14 minutes. That was because I kept changing my mind through the process. Anywho, this is a graduation card for a young lady at my church who is also transitioning from elementary school to middle school. While a lot of people don't see the significance in this, I believe this is a major step in a young person’s life and it should be celebrated. Everything they knew is no more. New adventures, experiences, discoveries, and maturity are ahead. That is HUGE!

I used the “reach for the sky” sentiment for a two fold reason. First to keep God in the midst of everything and when you reach for the sky, there is no limit to what can be done. She can do anything she puts her mind to. 

I wanted to keep this card quick and simple. I used two different Lawn Fawn stamp sets for the image. The images were colored in using Copics. Side note: I really need to buy more Copics! Being able to blend out colors is important. Moving on, I used a piece of scrap paper for the image matting. To finish the card, I stamped the sentiment and used Wink of Stella to go around the sentiment, bird and part of the balloon. What I did not realize is that I grabbed the wrong color of Wink of Stella, but it worked out in the end. 

On the inside of the card (not pictured), I stamped the little birdie and wrote my message. 

 I hope you enjoyed today’s project! Thanks for stopping by, Krafthead~

~~~Supplies~~~~

Paper Trey Ink (White)-card base
Bazzill (Blue)-mat
Neenah White Card Stock (White)-images
Copic Markers
Wink of Stella-Silver
TH Distress Ink-Faded Jeans

~~~Dies/Stamps~~~

Lawn Fawn- Blue Skies, Sunny Skies

MFT-Rounded Stitched Rectangle

Wednesday, May 27, 2015

DIY Stamping Tool- K. A. S. T. I.

Hi Krafters!

Everyone in the crafting/stamping world has heard of that new stamping tool. It costs about $50. It is magnetic and I think it is a great tool. It allows stamps to stamp in the same exact location. It is especially great if you need to mass produce cards with the same design. However, as a stay at home mom of five, sometimes, I can’t bite the bullet. So I try to think of ways to have a similar product I can make myself. I went back and forth on whether or not I was going to share the KASTI (Kenya’s Awesome Stamping Tool Imitated). I decided to go ahead. Hopefully the post will inspire you!

My first KASTI was made using a CD case. I printed grid lines from the internet and I even added a magnet to the cover. Here it is here: 


It worked perfectly, but the size was limited and I could not use my largest background stamp with it. 

I went online to see if I could find a product that I could use for the stamps.  I found a product and I will place an order soon. In the meantime, I had to think about what I had immediate access too. The lightbulb went off. As of now, I am not using the Cuttlebug, I thought, why not use the plates? The base are the two “B” plates. One I used for cutting and the other one was in good condition. For the positioners, I did a few accordion folds out of card stock and placed them on the edge of the plates. This ensured they were straight. I also used a T-square. I then cut a piece of magnet for the bottom. Then I printed two grids off the internet; one out of paper for the base and one out of transparency for the lid. The hinges were made from a sturdy card stock similar to what would be used for a mini album. That is it. As you can see, it works great! All I have to do is line the stamps with the grid on the lid! Best of all, it is not permanent! I can detach the edges wipe them off when I decide to use or sell the Cuttlebug. 


I hope you enjoyed today’s project! Thanks for stopping by, Krafthead~

Wednesday, May 6, 2015

Teacher Appreciation Treats

Hi Krafters!

I am continuing Teacher’s Appreciation projects. Today’s project is a sweet treat for the teachers. I ordered test tube treat bags which measures 1x8”. I filled each bag with one color and cut out rosettes in a coordinating color. Those are from the Silhouette Store. I added ribbon and stamping to the rosettes. To finish them off, I added Stickles in the same color to add a little sparkle to the treats. Easy to put together and affordable!


I hope you enjoyed today’s project! Thanks for stopping by, Krafthead~

Friday, February 14, 2014

Quick "Over the Moon" Valentine's Day Post

Happy Valentine's Day Krafters,

You know I could not let this special day go by without popping my head in for a moment. I believe we should so our love towards those special people in our lives each day, but it is nice to have a day set aside to celebrate it! Today I am sharing a Valentine's Day card I made for my hubby! I am sure he is going to like it :)


I did not want to spend a lot of time for this so I used papers from Recollections' Love Letter stack and the stamp set by CTMH (I purchased it with the Art Philosophy cartridge). I fussy cut some of the elements from the paper stack. For the other paper embellishments, I embossed the images using the stamp set and Lindy's Stamp Gang. It has a little gold in it. It looks great in person because it matches the paper, but when moved you can see the gold hint.

That's it! A simple way to say I love you!! Enjoy the rest of your day! Thanks for stopping by, Krafthead~


Thursday, May 2, 2013

Old School Birthday

Hi Krafters,

It has been a while since I posted so I put this card together. It just so happen to be one of my daughter's teacher's birthday too. She really liked it!


For this card, I used some Colorbok paper I had in my stash. I have had this paper for a LONG time! I am trying to use what I have. I fussy cut the flower and the scallops from the collection. The typewriter stamp is from Cloud Nine and the sentiment is Paper Studio.

It is a very simple card, but I hope you enjoyed it! Thanks for stopping by, Krafthead~

Tuesday, March 26, 2013

Practical Scrappers DT-Leave an Impression Mixed Media


Hello Krafters,

If you are a card maker, more than likely you use stamps for sentiments and an occasional image. Did you know you can use stamps for more than that? Oh yes! Stamps can be used to make pattern paper, add interest on layouts and just add the right element to a project. Check out how the Practical Scrappers DT used stamps. Today I decided to use a stamp on my mixed media project! Mixed media is a hot new trend. It is so much fun to do!

I cut down a piece of chipboard to 2.5x3.5". I used a collage stamp on some clay that I had in my stash. While that was in the oven, I layered some tissue paper on top of the chipboard for texture. Once the clay was set, I added it to the ATC. I added some flowers, chain and metal embellishments that I had in my stash.

 Next I painted everything with white Gesso. After the Gesso dried (I helped it using my heat tool), I added some Lindy's Stamp Gang (Gossamer Gold and Delphinium). Once, the sprays were dry, I stamped the collaged image with black Stazon Ink. Then I added Goosebumps spray for more texture.

That is it! I hope you enjoyed and try out today's project! Thank you so much for stopping by, Krafthead~

Monday, December 3, 2012

Silent Night


Happy December Krafters!

I started sharing Christmas/holiday related projects last week. However, this is my official holiday project share of the season! This is time of year for joy, peace and fellowship...Yay for the holidays!

Last year I did 25 days of projects…like last year, I will share cards, gift ideas and décor for the holidays, but it will not be each day! Don’t despair! There is a lot of inspiration coming your way J

inside of the card

Today I am sharing a card I made for a swap hosted by Mary Ann. We had to make 10 cards. Here is a video of how this card was put together.

 card front

matching envelope and card

 matching envelope


I hope you enjoyed today’s project. Thanks for stopping by, Krafthead~

Monday, November 5, 2012

Warm Winter Wishes


Happy Monday Krafters!

Do love to use stamps on your projects? Have you ever wanted to use stamps, but just don’t know how to use them?  If you answered yes to either question, check out Practical Scrappers for projects using stamps! That’s right; it is all about stamping today. The challenge was to use at least two stamps on a project. Stamps can give your layouts, altered pieces or cards the right oomph to make them even more spectacular!


For today’s project, I went with a card (yeah, I know). The coffee cup came from a stamp set by Pink by Design. The sentiment is by Inkadinakdoo and the snowflakes….not sure (sorry). I stamped the image on pattern paper from the Natural Stack by DCWV. I fussy cut it out! The snow flakes and sentiment were stamped with Versa Mark and heat embossed with Cesar’s Gold by Lindy’s Stamp Gang (I *heart* LSG). That gold went perfect with that brown! To finish the card, I rounded three of the corners with my Round it All.


A simple card to wish someone special “Warm Winter Wishes”…cause baby, it is cold outside now and it is going to get even colder! I hope you enjoyed today’s project. Thanks for stopping by, Krafthead~

Monday, October 29, 2012

Practical Scrappers DT Project: Lucky You/DT Call

Hello Krafters!

Today over at Practical Scrappers, we are showcasing cards and layouts using fabric. For my project, I decided to use a lacy fabric as the background to go along with the image J


I hope you enjoyed today’s project! Thank you so much for stopping by and thank you Netta for the stamp! Enjoy your day, Krafthead~

Also, Practical Scrappers is also have a DT Call! If you are interested in becoming a part of this awesomely talented team, I encourage you to go here for more information!

Monday, September 24, 2012

Practical Scrappers DT Project: Autumn Splendor

Hey hey Krafters!

Can you feel the crispness in the air yet? For the last few days, our evenings are starting to get chillier. A sure sign that summer is behind us and fall is amongst us. I have to admit, I am not a fan off fall per say. I do love going on long car rides to see the beautiful trees and their symphony of colors. I also love making big pots of homemade soups/stews and chillin’ with my family.

Today over at Practical Scrappers, it is all about welcoming fall! I enjoyed making this one because I finally used my Tim Holtz Distress Markers for something other than coloring flowers LOL! I found two pumpkin stamps in the dollar bin at M’s that I really liked. They were the inspiration for this card!

Thank you so much for stopping by! Don’t forget to go over the PS to check out projects; you will not be disappointed! Krafthead~

Products:

DCWV Ultimate Stack 2010

Burlap

Spellbinders Labels 27 (I think)

Distress Markers

Distress Ink

Monday, August 13, 2012

Practical Scrappers DT Project: Wild Child

Hi Krafters,

Today, I am sharing another Practical Scrappers design team project. The theme today is using notebook paper, ledger, stickers or so on! Make sure to stop by the blog to see some FANTASTIC projects!
I was looking through some photos and found this. I began to reminisce. My daughter loved to get her hair washed, but hated to get it combed. This is her trying to run away from getting her hair done. She was too funny! She was two years old in this photo.

I have really been into the whole Polaroid thing. I fussy cut this one from the paper stack! I think it reminds me of my grandmother's old camera! I can remember when that was so cool. You can get your photos right on the spot. I loved seeing the image emerge. I can even remember the smell.

I hope you enjoyed today’s project! Thank you so much for stopping by, Krafthead~

Products:

Cameo-title

7 Gypsies

DCWV Heirloom

Core’dinations-solid cardstock

Webster’s Pages Bloomers

Cherry Lynn Doily

 Martha Stewart Monarch Butterfly

TH Tissue Tape & Tickets

Recollections Bling

Collage Stamp

Poppy Lane Die-bird cage

EK Success Punch

Fiskars Punch

Walnut Stain Distress Stain

I Am Roses

Friday, June 22, 2012

Happy To Be Your Boy

Hello Krafters!

Today is the last day of the Father's Day dedication week. I am sharing a VERY simple Father’s Day card I made for DH to give to his dad. When I saw this stamp with the handshake, I thought of my FIL so I had to use it. My father-in-law is as simple as they come! He is not a very sentimental guy at all. I did not want to over embellish or put too much into it. Thanks for stopping by, Krafthead~


Products:

DCWV Guy Stack

Authentic Loyal Stickers

Tattered Angels Black Magic Glimmer Mist

Twine

Buttons

We R Memory Keepers Deco Punch

Momento Ink


Monday, June 18, 2012

Best Dad Ever!

Happy Monday Krafters!

This week will be dedicated to all of the dads out there! It takes a special man to be a dad. A dad is a man who provides, protects and spends time with his children. He supports them and encourages. I am happy that my children have a dad who is all of these things.


Today, I am sharing the card I made for DH. It was really fun to put together. The base is kraft card stock. I layered another piece of kraft cardstock which was corrugated. On top of that layer, I took a piece of pattern paper from the Time Piece Stack by DCWV. Then I used some of the TH tissue tape, ticket, added burlap, and some of the gears by Spellbinders.  I fussy cut the Polaroid from the same collection and also fussy cut the post card stamp. I embossed the sentiment and that is it!


I hope you enjoyed today’s project! Thanks for stopping by, Krafthead~

Products:

DCWV Time Piece Stack

Embossing Powder

Shapeabilities Gears (Donna Salazar)

Fiskars

TH Ticket

TH Tissue Tape

Burlap

Stamp

Kraft Cardstock

Inka Gold-Copper

We R Memory Keepers-Stub

Charm

Wednesday, May 23, 2012

NSBD-Warm-up Challenge


Hello Kafters!

A few weeks ago was National Scrapbooking Day. I played along over at Scrapbook.com! I had so much fun! Today, I am sharing the card I made for the warm-up challenge. We had to make a theme card. Since Mother’s Day was that weekend, I decided to follow that theme.


To all of my followers, thank you so much for your faithfulness! I appreciate each and every one of you! Thanks for stopping by, Krafthead~

Products:

Stamp

Banner Shapeabilities

Classic Oval Nesties

Scallop Oval Nesties

Copic Markers

Martha Stewart Punch

Flat Back Pearls

Embossing Folder

Momento Tuxedo Black

Diamond Stickles

Monday, May 7, 2012

Diva Mother


Happy Monday Krafters!

Today is going to kick start our week long Mother’s Day Celebration! I am sharing a simple card I made. This was fun to make and I am so happy about how it turned out. The stamp is by Close to My Heart….love it! The image is cut from a Nestability. It is layered on top of the DCWV Bella stack. To add to the design, I added a beautiful lace and pearl trim. The flowers are I Am Roses and the Mike’s dollar spot. I also added pearl and a leaf from the Foliage Shapeabilities.


Thank you all for stopping by! I can’t wait to see your Mother’s Day creations! Krafthead~

**TIP** use handmade or less expensive flowers in conjunction with your more expensive flowers (i.e. I Am Roses). Less expensive flowers are great to use as fillers J

Monday, March 5, 2012

Yay For Purple!

Happy Monday Krafters!

I hope you all had a great krafty weekend! My weekend was pretty nice. I was able to get a few things done around the house. Anywho, today I am sharing a quick and easy project. It only took a few minutes to put together.

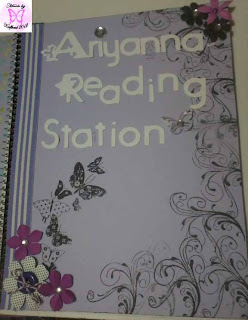
My oldest daughter’s favorite color is purple. She was pretty sad when she had to purchase a new notebook for her reading station that was red. So to lift her sadness, we put the Imagine to work! We really could have altered it up, but I wanted to leave simple since she is only in the second grade J

Front Cover:

I printed a solid purple sheet from Imagine More Cards at 8.5x11” (it had to be trimmed to size). *Yes I could have used a regular piece of cardstock, but I printed the pattern first and wanted the covers to match*I stamped a simple flourish (repeated) and a butterfly collage using Momento Black Ink. The letters were cut from the Hannah Montana Cartridge (one of my favorites!)  at 1”. To hide the red on the notebook, I colored the spine black with a Copic Marker and added a striped purple and white ribbon. I used Mother’s Day Bouquet for the flowers and flood filled them with colors and patterns from the Teresa Collins Black and White Imagine Cartridge. To finish it off, I added a few rhinestones and a butterfly from a Martha Stewart Punch.  

Back Cover:

This time I printed a pattern using the Imagine More Cards trimmed to size. I stamped one flourish to tie the front design to the back.  To keep her encouraged, I stamped “I’ll always be simply the best” on the back.

That’s it! She now has a simple but cute notebook to take to school that she adores J I hope you enjoyed today’s project. As always, thanks for stopping by, Krafthead~

Friday, March 2, 2012

Thank You~


Happy Friday Krafters!

Can you believe it is March already??? Time is going by so quickly! Spring will be here before we know it!
I have a good friend who has been involved in some of the most important events in my life. We do not talk often, but we check in from time to time. I never realized how she has impacted me. She is a true jewel! Recently, she sent me a card out of the blue and it meant so much to me. I will cherish our friendship.
This card very busy; yet it is a true reflection of her and her personality. I used Graphic 45’s Le Romantique for all of the pattern papers. I tell you, those papers are gorgeous!
I appreciate your visit! I hope you enjoyed today’s project, Krafthead~

Please remember to stop by my other blog for more projects :)

Wednesday, February 22, 2012

17 Years~

Hi Krafters!
It has been a very long week and it is not even over yet LOL! My friend and her husband recently celebrated their 17th wedding anniversary. They met in college. They were just friends, but the husband was in a bad car accident. He had to leave school, and for a short time they kept in touch by writing letter. Eventually the letters stopped. A few years went by and my friend found out they he had married. She became engaged. More years went by and they ended up being in a wedding party together. By that time, her engagement was called off and he just finalized his divorce. Long story short, they are married a short time later and now have three beautiful children!
I thought this was the perfect card for them! It is not too feminine, but not too masculine either. I am in love with the Picot Edge Die so I find I am using it on almost everything I can LOL! I had to use it! This card was inspired by the Love Notes stamp. It went well with the postage stamp cut from the Sentiment Cricut Cartridge. I also knew I wanted to incorporate the numbers pattern on the TC B&W Imagine Cartridge.  I added a Pendant to emphasize the number 17 on the pattern…this is probably one of my favorite projects to date!
I hope you all enjoyed today’s project. As always, thanks for stopping by, Krafthead~


Materials:
Cricut Imagine
Teresa Collins Black & White
Sentiments Cricut Cartridge
Bazzill-Black
Paper Trey Ink-Vintage Cream
Cuttlebug-Script
Grand Calibur
Picot Edge Die
Pendant Die
Fancy Tags
Burlap
Vintage Lace
Antique Linen Distress Stain
Suede Glimmer Mist
Momento-Black
Gold Alcohol Ink
Flat Back Pearls-Pearl, Black
Ribbon
Love Note Stamp
Glossy Accents

Friday, February 17, 2012

Just Me Thinking of You~

Happy Friday Krafters~
Today I am sharing a Gina K. inspired project. On her YouTube channel, she shared a beautiful card and I knew I had to try it! This card is an easy and cost effective project with beautiful results.
Thank you stopping by, Krafthead~
Materials:
Distress Ink-Old Paper
Webster’s Pages
Unity Stamp
Bazzill
Momento-Black

Wednesday, February 15, 2012

Happy Valentine's Day~

Happy Wednesday Krafters!
Although Valentine’s Day is officially over, love is always and forever. Today, I would like to share another simple card I made for my mom. It literally took minutes to put together.
Hope you enjoyed today’s project. Thanks for stopping by, Krafthead~
Materials:
Grand Calibur
Picot Die
Labels 12
Recollections Valentine’s Paper
Bazzill
Close to My Heart-Mad About You Stamp Set
Distress Ink-Walnut Stain
Ribbon
I Am Roses
Flat Back Pearls
Studio G Ink-Red
Momento Ink-Black